AWS Amplify の新機能 override を少し試してみる
[point_maker type=“heading_icon” base_color=“apple_green” title_icon=“info-circle-solid” title_color_background=“true” title_color_border=“false” content_type=“text” content_color_background=“true” content_color_border=“false” block_editor=“true”]
こちらは、 “ゆるWeb勉強会@札幌 Advent Calendar 2021” の 8日目の記事です。
[/point_maker]
AWS Amplify に色々と新機能が追加されています。先日書いた Amplify UI もその一つです。
今回の記事は、バックエンド周りの更新の一つ、設定を CDK を使って上書き(override)するというものを実際にやってみます。
https://twitter.com/AWSBlogs/status/1460290810147221508?s=20
設定と確認が簡単にできるように、認証時のパスワードの最低長の変更をやってみましょう。
細かい設定や導入は省きます。
オフィシャルのブログはこちらです。
https://aws.amazon.com/blogs/mobile/override-amplify-generated-backend-resources-using-cdk/
日本語版はこちら。
https://aws.amazon.com/jp/blogs/news/override-amplify-generated-backend-resources-using-cdk/
やってみる
パスワード最低長 8文字 (デフォルト)
React のプロジェクトを作成し、 Amplify のプロジェクト化します。
$ npx create-react-app react-amplified
$ cd react-amplified
$ amplify init
$ npm install aws-amplify @aws-amplify/ui-react
$ amplify add auth
Using service: Cognito, provided by: awscloudformation

 The current configured provider is Amazon Cognito.

 Do you want to use the default authentication and security configuration? Default configuration
 Warning: you will not be able to edit these selections.
 How do you want users to be able to sign in? Username
✅ Successfully added auth resource reactamplifiede4953db7 locally

✅ Some next steps:
"amplify push" will build all your local backend resources and provision it in the cloud
"amplify publish" will build all your local backend and frontend resources (if you have hosting category added) and provision it in the cloud
$
できたら、下記のようにファイルを修正して認証画面を表示できるようにします。
/react-amplified/src/index.js
import React from 'react';
import ReactDOM from 'react-dom';
import './index.css';
import App from './App';
import reportWebVitals from './reportWebVitals';

import Amplify from "aws-amplify";
import { AmplifyProvider } from '@aws-amplify/ui-react';
import '@aws-amplify/ui-react/styles.css'; // default theme
import awsExports from "./aws-exports";
Amplify.configure(awsExports);

ReactDOM.render(
  <React.StrictMode>
    <AmplifyProvider>
      <App />
    </AmplifyProvider>
  </React.StrictMode>,
  document.getElementById('root')
);

// If you want to start measuring performance in your app, pass a function
// to log results (for example: reportWebVitals(console.log))
// or send to an analytics endpoint. Learn more: https://bit.ly/CRA-vitals
reportWebVitals();
/react-amplified/src/App.js
import logo from './logo.svg';
import './App.css';

import { Authenticator, Button } from '@aws-amplify/ui-react';

function App() {
  return (
    <div className="App">
      <Authenticator>
        {({ signOut, user }) => (
          <header className="App-header">
            <img src={logo} className="App-logo" alt="logo" />
            <p>
              Edit <code>src/App.js</code> and save to reload.
            </p>
            <a
              className="App-link"
              href="https://reactjs.org"
              target="_blank"
              rel="noopener noreferrer"
            >
              Learn React
            </a>
            <Button variation="primary" onClick={signOut}>Sign out</Button>
          </header>
        )}
      </Authenticator>
    </div>
  );
}

export default App;
プロジェクトを push します。
$ amplify pushローカルで動作確認しましょう。
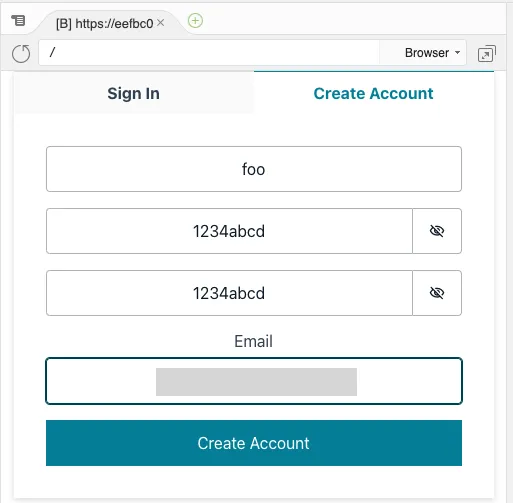
下記のように、 Create Account からアカウント作成します。
このとき、パスワードが8文字で作成可能なことを確かめます。

パスワード最低長 15文字 (override)
では、パスワードの最低長を15文字に変更してみましょう。
まずは、 override を実行します。
$ amplify override authエディタは None を選んでおくとよいです。
完了すると、下記のファイルが生成されています。
reactamplifiede4953db7 の部分が、各自の環境で異なるので注意してください。
/react-amplified/amplify/backend/auth/reactamplifiede4953db7/override.ts
import { AmplifyAuthCognitoStackTemplate } from '@aws-amplify/cli-extensibility-helper';

export function override(resources: AmplifyAuthCognitoStackTemplate) {

}
では、パスワードの最低長を15文字にしましょう。
設定項目の参考になるのは、こちらのドキュメントです。
下記のように修正すればOKです。
import { AmplifyAuthCognitoStackTemplate } from '@aws-amplify/cli-extensibility-helper';

export function override(resources: AmplifyAuthCognitoStackTemplate) {
  resources.userPool.policies = {
    passwordPolicy: {
      ...resources.userPool.policies["passwordPolicy"],
      minimumLength: 15,
    }
  }
}
では、再び push しましょう。きちんと Update となっていますね。
$ amplify push
✔ Successfully pulled backend environment dev from the cloud.

    Current Environment: dev

┌──────────┬────────────────────────┬───────────┬───────────────────┐
│ Category │ Resource name          │ Operation │ Provider plugin   │
├──────────┼────────────────────────┼───────────┼───────────────────┤
│ Auth     │ reactamplifiede4953db7 │ Update    │ awscloudformation │
└──────────┴────────────────────────┴───────────┴───────────────────┘
? Are you sure you want to continue? Yes

...

$
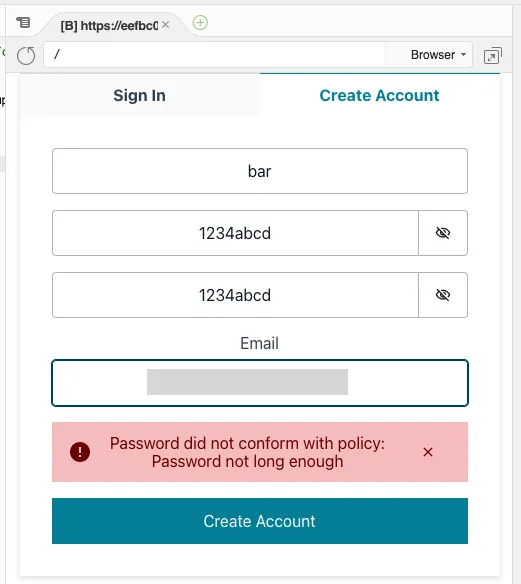
push が終わったら、再度 Create Account です。
パスワードが8文字だと、バリデーションエラーとなることが確認できます。

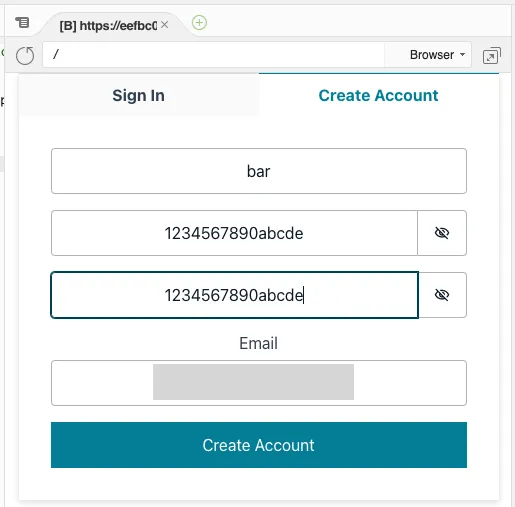
パスワードを15文字にすると、きちんと次に進むことができました。

Cognito ユーザープールの設定画面でも、設定が有効になっていることを確認できます。

まとめ
override 機能を使って、CDKを使った設定の上書きができました。
ただ、仕組みは CDK ではあるのですが、設定項目のベースは CloudFormation の設定になるようなので、参照する情報に注意が必要そうでした。
公式ドキュメントに上書きできる項目とリンクがあるので、ちゃんとドキュメントを読みましょう。
https://docs.amplify.aws/cli/auth/override/#customize-amplify-generated-cognito-auth-resources