Raspberry Pi を AWS Amplify から操作するために AppSync の Subscription を受け取りたい (Node.js)
[point_maker type=“heading_icon” base_color=“apple_green” title_icon=“info-circle-solid” title_color_background=“true” title_color_border=“false” content_type=“text” content_color_background=“true” content_color_border=“false” block_editor=“true”]
こちらは、“AWS Amplify Advent Calendar 2021 カレンダー2” および、
“ゆるWeb勉強会@札幌 Advent Calendar 2021” の 12日目の記事です。(後から埋めました)
[/point_maker]
色々あって、 AWS Amplify で作った画面から Raspberry Pi に繋いだ LED をチカチカさせたいわけです。
ということで、 AppSync (Amplify の APIの裏側) の Subscription を Raspberry Pi で受け取れるようにします。
環境構築周りの細かい部分は省きます。
なお、この手順は 2021年12月19日 (JST) での情報となります。
準備
Amplify のプロジェクト
今回は AppSync のリソースを用意できれば良いので、細かいところは気にせずに。
すでに使える Amplify 環境がある前提として、 amplify add api をやるだけです。
また、サンプルの schema として “Todo” のものを選択しておきます。認証は API Key を選択します。
Raspberry Pi
Node.js v14 以上をインストールしておきます。
今回は当初 Node-RED を使うつもりだったので、 Node-RED のインストールで導入されるバージョンを利用しています。
実装
オフィシャルのドキュメント
https://docs.aws.amazon.com/ja_jp/appsync/latest/devguide/building-a-client-app-node.html
ほぼここにある手順、コードで動いたのですが、ライブラリのバージョンの影響を受けるものがありそうでした。
それを踏まえ、ドキュメントに沿って進めていきます。
GraphQL スキーマ
schema は AWS Amplify で自動生成された下記の状態を前提にします。
type Todo @model {
  id: ID!
  name: String!
  description: String
}
GraphQL API エンドポイント
AWS Amplify のプロジェクトにある src/aws-exports.js をみるとよいです。
/* eslint-disable */
// WARNING: DO NOT EDIT. This file is automatically generated by AWS Amplify. It will be overwritten.

const awsmobile = {
    "aws_project_region": "ap-northeast-1",
    "aws_appsync_graphqlEndpoint": "https://XXXXXXXXXXXXXXXXXXXXXXXXXX.appsync-api.ap-northeast-1.amazonaws.com/graphql",
    "aws_appsync_region": "ap-northeast-1",
    "aws_appsync_authenticationType": "API_KEY",
    "aws_appsync_apiKey": "da2-XXXXXXXXXXXXXXXXXXXXXXXXXX"
};


export default awsmobile;
ここの情報を、後ほど利用するので開いたままにしておくか、別途メモを取っておいてください。
クライアントアプリケーションの作成
mkdir appsync && cd appsync
touch index.js aws-exports.js
ここは、手順通りで良いです。
次に npm init は、npm init -y としてデフォルトの情報で補完してしまった方が楽です。
少しあとに追加するライブラリがありますが、ここがネックとなります。
最終的に詰まったのは graphql のバージョンでした。npm install でライブラリを一度に追加してしまうと、バージョンの依存関係を解決できずに終了してしまいます。
結局、 graphql ライブラリについてはバージョン指定が必要となります。
下記の流れで npm install していくと良さそうです。
npm install aws-appsync
npm install apollo-cache-inmemory apollo-client apollo-link apollo-link-http aws-sdk es6-promise graphql-tag isomorphic-fetch ws
npm install graphql@14.7.0
上記の手順でできあがった package.json は下記となります。 (2021/12/09 JST)
{
  "name": "appsync",
  "version": "1.0.0",
  "description": "",
  "main": "index.js",
  "scripts": {
    "test": "echo \"Error: no test specified\" && exit 1"
  },
  "keywords": [],
  "author": "",
  "license": "ISC",
  "dependencies": {
    "apollo-cache-inmemory": "^1.6.6",
    "apollo-client": "^2.6.10",
    "apollo-link": "^1.2.14",
    "apollo-link-http": "^1.5.17",
    "aws-appsync": "^4.1.4",
    "aws-sdk": "^2.1046.0",
    "es6-promise": "^4.2.8",
    "graphql": "^14.7.0",
    "graphql-tag": "^2.12.6",
    "isomorphic-fetch": "^3.0.0",
    "ws": "^8.3.0"
  }
}
続けて、 index.js は下記のようにします。前提として API_KEY 認証を使う書き方なのと、 Subscription 実行のみに絞ったものにしています。(サンプルは Query のコードも入っているので)
'use strict';

global.WebSocket = require('ws');
require('es6-promise').polyfill();
require('isomorphic-fetch');

// Require AppSync module
const AUTH_TYPE = require('aws-appsync-auth-link/lib/auth-link').AUTH_TYPE;
const AWSAppSyncClient = require('aws-appsync').default;

const aws_exports = require('./aws-exports').default;
const url = aws_exports.ENDPOINT;
const region = aws_exports.REGION;
const type = AUTH_TYPE.API_KEY;
const apiKey = aws_exports.API_KEY;

const AWS = require('aws-sdk');
AWS.config.update({
  region: aws_exports.REGION,
});

// Set up a subscription query
const gql = require('graphql-tag');
const subquery = gql(`
subscription OnCreateTodo {
  onCreateTodo {
    id
    name
    description
    createdAt
    updatedAt
  }
}`);

const client = new AWSAppSyncClient({
  url: url,
  region: region,
  auth: {
    type: type,
    apiKey: apiKey,
  },
  disableOffline: true,
});

client.hydrated().then(function (client) {
  //Now subscribe to results
  const observable = client.subscribe({ query: subquery });

  const realtimeResults = function realtimeResults(data) {
    console.log('realtime data: ', data);
  };

  console.log('start subscription');
  observable.subscribe({
    next: realtimeResults,
    complete: console.log,
    error: console.log,
  });
});
aws-exports.js は下記となります。 Amplify のプロジェクトで生成された src/aws-exports.js の該当箇所を転記してください。
'use strict';
Object.defineProperty(exports, '__esModule', { value: true });
var config = {
  REGION: '[Amplifyのaws-exports.js > awsmobile.aws_appsync_region]',
  ENDPOINT: '[Amplifyのaws-exports.js > awsmobile.aws_appsync_graphqlEndpoint]',
  API_KEY: '[Amplifyのaws-exports.js > awsmobile.aws_appsync_apiKey]',
};
exports.default = config;
実行
作業している Raspberry Pi のターミナルで node index.js としましょう。
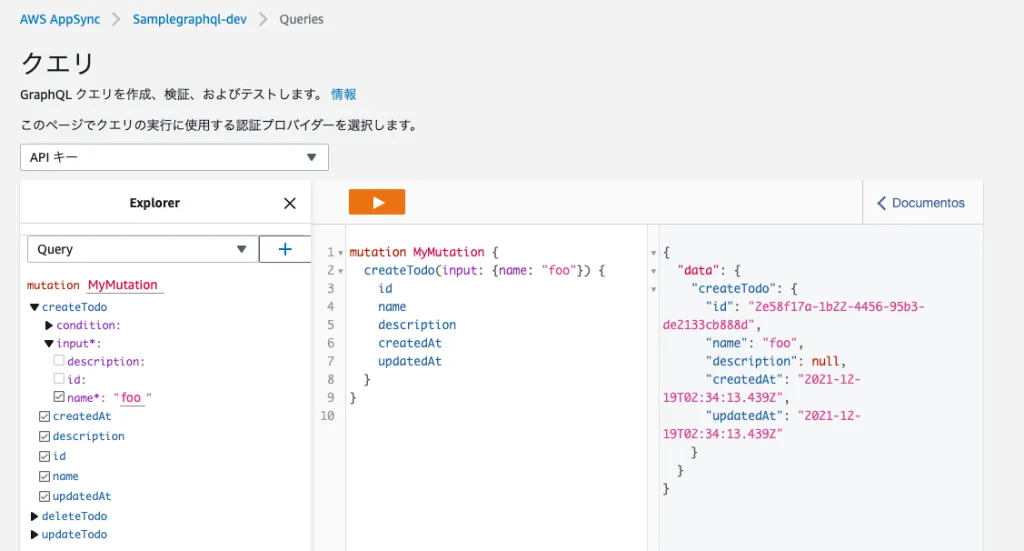
start subscription と表示されたら、AWSコンソールの AppSync を開き、該当する AppSync のプロジェクトの “クエリ” を開き、下記のようにして実行します。

うまくいけば、下記のように Raspberry Pi 側で結果を受信できているはずです。
$ node index.js
start subscription
realtime data:  {
  data: {
    onCreateTodo: {
      id: '2e58f17a-1b22-4456-95b3-de2133cb888d',
      name: 'foo',
      description: null,
      createdAt: '2021-12-19T02:34:13.439Z',
      updatedAt: '2021-12-19T02:34:13.439Z',
      __typename: 'Todo'
    }
  }
}
id や createdAt などが一致していることが確認できるはずです。
これで、 Amplify から Raspberry Pi へ情報を送ることができるようになりました。
情報さえ受け取れれば、あとは Raspberry Pi 側で色々とやるだけです。それについては、後日。