
[point_maker type=“heading_icon” base_color=“apple_green” title_icon=“info-circle-solid” title_color_background=“true” title_color_border=“false” content_type=“text” content_color_background=“true” content_color_border=“false” block_editor=“true”]
こちらは、 “ゆるWeb勉強会@札幌 Advent Calendar 2022” の 14日目の記事です。
および、 “AWS Advent Calendar 2022” の 14日目の記事です。
[/point_maker]
こちらは、以前に私の書いた下記記事の和訳となります。
https://dev.to/aws-builders/how-to-call-aws-step-functions-from-aws-amplify-21lm
目的
こちらの記事を読んで、 AWS AppSync から AWS Step Functions を呼べることがわかりました。
https://awstip.com/aws-amplify-initialize-step-functions-execution-from-appsync-ad32b9dc35be
この記事では、 VTL ファイルを利用して AppSync のリゾルバを AWS Amplify 内で定義して AWS Step Functions を呼んでいます。
しかし、現在は Amplify Custom 機能を使うことによって、 AWS CDK を AWS Amplify 内で使うことができます。
そして、私は AWS CDK で書きたいです。
ということで、 AWS CDK を使う方法に書き換えてみます。
なぜ AWS Step Functions を AWS Amplify から呼ぶのか
多くの場合、AWS Amplify はフロントエンド側にロジックを実装する必要がありました。
AWS Amplify から AWS Step Functions を呼び出すことができれば、サーバーレスで構築されたバックエンドにロジックを配置できるようになります。
これは、スケーラビリティ、セキュリティなど、多くの面で良い効果が期待できます。
どのようにやるか
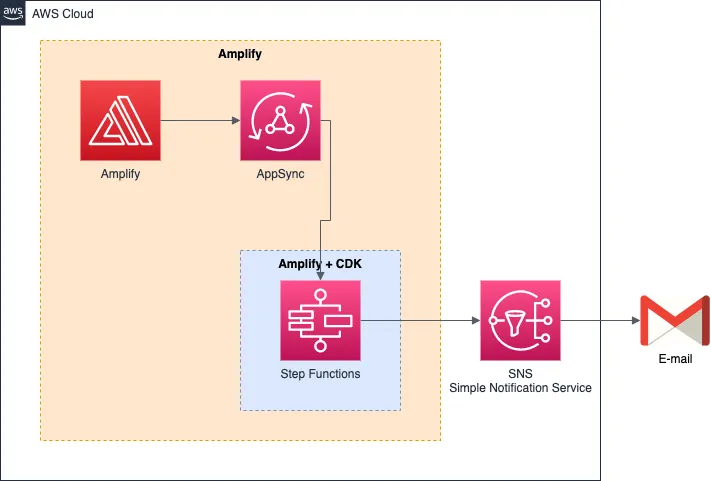
図: AWS Amplify から AWS Step Functions を呼ぶためのアーキテクチャ
Amplify Custom 機能により、AWS Amplify 内で AWS CDK を使用できます。
ただし、AWS CDK v1 を使用する必要があります。
[訳注 2022/12/14] Amplify Custom で利用する AWS CDK に v2 が Preview 版として取り込まれました。
プロジェクト作成
% npm create vite@latest sample-app -- --template react-ts
% cd sample-app
% amplify init
% npm i @aws-amplify/ui-react aws-amplify
API (GraphQL) の追加
% amplify add api
❯ GraphQL
❯ Continue
❯ Single object with fields (e.g., “Todo” with ID, name, description)
? Do you want to edit the schema now? (Y/n) ‣ no
自分の作成した API名を確認し、 [YOUR_API_NAME] を変更して該当するファイルを編集してください。
[PROJECT_TOP]/amplify/backend/api/[YOUR_API_NAME]/schema.graphql
# This "input" configures a global authorization rule to enable public access to
# all models in this schema. Learn more about authorization rules here: https://docs.amplify.aws/cli/graphql/authorization-rules
input AMPLIFY { globalAuthRule: AuthRule = { allow: public } } # FOR TESTING ONLY!

type Todo @model {
  id: ID!
  name: String!
  description: String
}

type Mutation {
  sendSns(subject: String, message: String): String
}
AWS Step Functions を呼ぶための Mutation を追加します。
Custom (AWS CDK) の追加
% amplify add custom
❯ AWS CDK
? Provide a name for your custom resource ‣ [YOUR_CUSTOM_RESOURCE_NAME]
? Do you want to edit the CDK stack now? (Y/n) ‣ no

% cd amplify/backend/custom/[YOUR_CUSTOM_RESOURCE_NAME]
% npm i @aws-cdk/aws-appsync @aws-cdk/aws-stepfunctions @aws-cdk/aws-stepfunctions-tasks
% cd ../../../..
custom リソース名を確認し、 [YOUR_CUSTOM_RESOURCE_NAME] を変更して作業を行なってください。
また、事前に SNS のセットアップを行ない ARN を確認し、 [SNS_ARN] を置き換えてください。
そして [REGION] を利用するプロジェクトのリージョンへ置き換えてください。
[PROJECT_TOP]/amplify/backend/custom/[YOUR_CUSTOM_RESOURCE_NAME]/cdk-stack.ts
import * as cdk from '@aws-cdk/core';
import * as AmplifyHelpers from '@aws-amplify/cli-extensibility-helper';
import { AmplifyDependentResourcesAttributes } from '../../types/amplify-dependent-resources-ref';
import * as iam from '@aws-cdk/aws-iam';
import * as appsync from '@aws-cdk/aws-appsync';
import * as sns from '@aws-cdk/aws-sns';
import * as stepfunctions from '@aws-cdk/aws-stepfunctions';
import * as tasks from '@aws-cdk/aws-stepfunctions-tasks';

export class cdkStack extends cdk.Stack {
  constructor(
    scope: cdk.Construct,
    id: string,
    props?: cdk.StackProps,
    amplifyResourceProps?: AmplifyHelpers.AmplifyResourceProps
  ) {
    super(scope, id, props);
    /* Do not remove - Amplify CLI automatically injects the current deployment environment in this input parameter */
    new cdk.CfnParameter(this, 'env', {
      type: 'String',
      description: 'Current Amplify CLI env name'
    });
    /* AWS CDK code goes here - learn more: https://docs.aws.amazon.com/cdk/latest/guide/home.html */

    // # Step Functions
    // ## Define Tasks
    // ### Choice
    const choiceTask = new stepfunctions.Choice(this, 'choiceTask');
    // Wait
    const waitTask = new stepfunctions.Wait(this, 'waitTask', {
      time: stepfunctions.WaitTime.duration(cdk.Duration.seconds(5))
    });
    // ### SNS
    const snsTopic = sns.Topic.fromTopicArn(
      this,
      'topic',
      '[SNS_ARN]'
    );
    const snsTask = new tasks.SnsPublish(this, 'publish', {
      topic: snsTopic,
      integrationPattern: stepfunctions.IntegrationPattern.REQUEST_RESPONSE,
      subject: stepfunctions.TaskInput.fromJsonPathAt('$.input.subject').value,
      message: stepfunctions.TaskInput.fromJsonPathAt('$.input.message')
    });

    // ### Role for SNS called from Step Functions
    const statesRole = new iam.Role(this, 'StatesServiceRole', {
      assumedBy: new iam.ServicePrincipal('states.[REGION].amazonaws.com')
    });

    // ## Set Step Functions
    const sf = new stepfunctions.StateMachine(this, 'StateMachine', {
      // stateMachineType: stepfunctions.StateMachineType.EXPRESS,
      definition: choiceTask
        .when(
          stepfunctions.Condition.stringEquals('$.input.subject', 'wait'),
          waitTask.next(snsTask)
        )
        .otherwise(snsTask),
      role: statesRole
    });

    // # AppSync
    // ## Access other Amplify Resources
    const retVal: AmplifyDependentResourcesAttributes =
      AmplifyHelpers.addResourceDependency(
        this,
        amplifyResourceProps.category,
        amplifyResourceProps.resourceName,
        [
          {
            category: 'api',
            resourceName: '[YOUR_API_NAME]'
          }
        ]
      );

    // ## Request VTL
    const requestVTL = `
      $util.qr($ctx.stash.put("executionId", $util.autoId()))

      #set( $Input = {} )
      $util.qr($Input.put("subject", $ctx.args.subject))
      $util.qr($Input.put("message", $ctx.args.message))

      #set( $Headers = {
        "content-type": "application/x-amz-json-1.0",
        "x-amz-target":"AWSStepFunctions.StartExecution"
      } )
      #set( $Body = {
        "stateMachineArn": "${sf.stateMachineArn}"
      } )

      #set( $BaseInput = {} )
      $util.qr($BaseInput.put("input", $Input))
      $util.qr($Body.put("input", $util.toJson($BaseInput)))

      #set( $PutObject = {
        "version": "2018-05-29",
        "method": "POST",
        "resourcePath": "/"
      } )
      #set ( $Params = {} )
      $util.qr($Params.put("headers",$Headers))
      $util.qr($Params.put("body",$Body))

      $util.qr($PutObject.put("params",$Params))
      $util.toJson($PutObject)
    `;
    // ## Response VTL
    const responseVTL = `
      $util.toJson($ctx.result)
    `;

    // ## Role for Step Functions
    const stepFunctionsRole = new iam.Role(this, 'stepFunctionsRole', {
      assumedBy: new iam.ServicePrincipal('appsync.amazonaws.com')
    });
    stepFunctionsRole.addToPolicy(
      new iam.PolicyStatement({
        actions: ['states:StartExecution'],
        resources: [sf.stateMachineArn]
      })
    );

    // ## AppSync DataSource
    const dataSourceId = 'sendSnsHttpDataSource';
    const dataSource = new appsync.CfnDataSource(this, dataSourceId, {
      apiId: cdk.Fn.ref(retVal.api.[YOUR_API_NAME].GraphQLAPIIdOutput),
      name: dataSourceId,
      serviceRoleArn: stepFunctionsRole.roleArn,
      type: 'HTTP',
      httpConfig: {
        endpoint: 'https://states.[REGION].amazonaws.com',
        authorizationConfig: {
          authorizationType: 'AWS_IAM',
          awsIamConfig: {
            signingRegion: '[REGION]',
            signingServiceName: 'states'
          }
        }
      }
    });

    // ## AppSync Resolver
    const resolver = new appsync.CfnResolver(this, 'custom-resolver', {
      apiId: cdk.Fn.ref(retVal.api.[YOUR_API_NAME].GraphQLAPIIdOutput),
      fieldName: 'sendSns',
      typeName: 'Mutation',
      requestMappingTemplate: requestVTL,
      responseMappingTemplate: responseVTL,
      dataSourceName: dataSource.name
    });
  }
}
Amplify プロジェクトのプッシュ
% amplify pushAmplify プロジェクトをプッシュし、少し待ちます。
他のコードの設定
Viteやフロントエンドのコードを設定していきます。
[PROJECT_TOP]/vite.config.ts
import { defineConfig } from "vite";
import react from "@vitejs/plugin-react";

// https://vitejs.dev/config/
export default defineConfig({
  plugins: [react()],
  server: {
    port: 8080,
  },
  resolve: {
    alias: [
      { find: "./runtimeConfig", replacement: "./runtimeConfig.browser" },
      { find: "@", replacement: "/src" },
    ],
  },
});
[PROJECT_TOP]/index.html
<!DOCTYPE html>
<html lang="en">
  <head>
    <meta charset="UTF-8" />
    <link rel="icon" type="image/svg+xml" href="/vite.svg" />
    <meta name="viewport" content="width=device-width, initial-scale=1.0" />
    <title>Vite + React + TS</title>
  </head>
  <body>
    <div id="root"></div>
    <script type="module" src="/src/main.tsx"></script>
    <script>
      window.global = window;
      window.process = {
        env: { DEBUG: undefined },
      };
      var exports = {};
    </script>
  </body>
</html>
[PROJECT_TOP]/src/main.tsx
import React from 'react';
import ReactDOM from 'react-dom/client';
import App from './App';
import '@aws-amplify/ui-react/styles.css';

import { Amplify } from 'aws-amplify';
import awsExports from './aws-exports';
Amplify.configure(awsExports);

ReactDOM.createRoot(document.getElementById('root') as HTMLElement).render(
  <React.StrictMode>
    <App />
  </React.StrictMode>
);
[PROJECT_TOP]/src/App.tsx
import React, { useState } from 'react';

import { Flex, Button, TextField } from '@aws-amplify/ui-react';

import { API } from 'aws-amplify';
import { sendSns } from './graphql/mutations';

function App(): JSX.Element {
  const [subject, setSubject] = useState('');
  const [message, setMessage] = useState('');

  const callSendSns = async (): Promise<void> => {
    if (!subject || subject.length === 0) {
      return;
    }
    if (!message || message.length === 0) {
      return;
    }

    const result = await API.graphql({
      query: sendSns,
      variables: {
        subject,
        message
      },
      authMode: 'API_KEY'
    });
    console.log('callSendSns', result);
    setSubject('');
    setMessage('');
  };

  const handleSetSubject = (event: React.FormEvent<HTMLInputElement>): void => {
    setSubject((event.target as any).value);
  };
  const handleSetMessage = (event: React.FormEvent<HTMLInputElement>): void => {
    setMessage((event.target as any).value);
  };

  return (
    <Flex direction="column">
      <TextField
        placeholder="Subject"
        label="Subject"
        isRequired={true}
        value={subject}
        errorMessage="There is an error"
        onInput={handleSetSubject}
      />
      <TextField
        placeholder="Message"
        label="Message"
        isRequired={true}
        value={message}
        errorMessage="There is an error"
        onInput={handleSetMessage}
      />
      <Button
        type="submit"
        variation="primary"
        onClick={() => {
          callSendSns();
        }}
      >
        Send SNS
      </Button>
    </Flex>
  );
}

export default App;
操作の確認(動画)
実際の動作を確認しましょう。
% npm run devGIF動画はこちらです。